Setup Development Environment
Download
The latest build of MXFramework is hosted on GitHub. Click on the following link to download the latest source code from GitHub.
https://github.com/MagicCube/mxframework-core/archive/master.zip
What's included
Once downloaded, unzip the file to a new folder named mx, within which you'll find the following directories and files.
These include all you need for MXFramework.
mx
├── app
│   └── Application.js
├── res
│   ├── images
│   │   └── mx-logo-32.png
│   └── locales
│       ├── en
│       │   └── language.js
│       └── zh-cn
│           └── language.js
├── scn
│   └── Scene.js
├── util
│   └── ObjectPool.js
├── view
│   └── View.js
├── debug.js
├── framework-base.js
├── framework-core.js
├── javascript-extensions.js
├── mx.build
├── MXComponent.js
├── MXEvent.js
├── MXObject.js
└── README.md
Dependencies
MXFramework only requires jQuery library at the run time. It is recommended to use jQuery 1.10 or later version.
Eclipse Plugins
Although you can complete the following setup steps all by your hands, it is still the best way to start your MXFramework journey by installing the MXFramework Plugins for Eclipse.
Install
- Start your Eclipse, choose
Help > Install New Softwarein the menu bar. - Click
Add, in the top-right corner.
- In the
Add Repositorydialog that appears, enterMXFramework Pluginfor theNameand the following URL for theLocation:https://raw.githubusercontent.com/MagicCube/mxtool/master/mxtool-eclipse-updatesite/site.xml - Click
OK. - In the
Available Softwaredialog, select the checkbox next toMagicCube MXFramework Pluginsand clickNext.
- Click
Next, and complete the following installation. - After the installation completes, restart Eclipse.
Tips
For the convenience of the beginner, in the following sections we'll only discuss how to setup your environment by using the plugins.
Basic concepts
Before writing code, there are some basic concepts about MXFramework you should learn first.
Project with MXFramework
The same concept as a Eclipse project, and usually it's a Web Project.
Modules in MXFramework
You can define several modules in an MX project.
The module name is recommended to be short and in lower-case like "sys", "fs" or "g3d".
Every module has its own folder which has the same name as the module.
For example, the codes of module MODULE_NAME should be put into the folder scripts/MODULE_NAME, and all its resources like CSSs, images and localization files should be stored under the scripts/MODULE_NAME/res folder.
A common folder structure is look like this
scripts
├── mx
│   ├── res
│   │   └── locales
│   │       ├── en
│   │       │   └── language.js
│   │       └── zh-cn
│   │           └── language.js
│   ├── debug.js
│   ├── framework-base.js
│   ├── framework-core.js
│   └── ...
├── mod1
│   ├── res
│   │   ├── images
│   │   ├── locales
│   │   │   ├── en
│   │   │   │   └── language.js
│   │   │   └── zh-cn
│   │   │       └── language.js
│   │   └── AClassView.css
│   │   └── BClassView.css
│   ├── logic
│   │   ├── XClass.js
│   │   └── YClass.js
│   └── view
│       ├── AClassView.js
│       └── BClassView.js
├── mod2
│   ├── res
│   │   ├── images
│   │   └── CClassView.css
│   │   └── DClassView.css
│   └── view
│       ├── CClassView.js
│       └── DClassView.js
└── ...
Unlike the AMD(Asynchronous Module Definition) and many other modularized frameworks, there's no explicit definition for the module dependencies in MXFramework. Both static and dynamic module loading are handled by the framework. When you import a class from "A module" for the first time, the framework will automatically asynchronously or synchronously load the module before you go.
Concerning the performance and efficiency, in the production mode, after running a building process using MXBuild, all the JavaScript codes inside the module will be compiled into one file named min.js under the scripts/MODULE_NAME folder, while CSS will be compressed into a min.css file under scripts/MODULE_NAME/res.
The folder structure in production mode should look like this
scripts
├── mx
│   ├── res
│   │   └── locales
│   │       ├── en
│   │       │   └── language.js
│   │       └── zh-cn
│   │           └── language.js
│   └── min.js
├── mod1
│   ├── res
│   │   ├── images
│   │   ├── locales
│   │   │   ├── en
│   │   │   │   └── language.js
│   │   │   └── zh-cn
│   │   │       └── language.js
│   │   └── min.css
│   └── min.js
├── mod2
│   ├── res
│   │   ├── images
│   │   └── min.css
│   └── min.js
└── ...
By default, there's always a framework-level module named mx stored in scripts/mx.
Please read Object Oriented Programming Guide for further information.
Applications in MXFramework
There could be several applications inside one module. Basically you could regard the applications as the traditional web pages.
Every application class should inherit from mx.app.Application which has a run(options) function.
After initialization, you call the run function directly to start the application with specific options.
Views in MXFramewrok
A View in MXFramework represents a UI component which can display informations and interact with the users.
View often comes with a JavaScript and a CSS file, both of the file share the same name but different extensions.
Usually a View is related to a HTML element, and View has a $container field which is pointed to a jQuery object of the HTML element.
Every View class should inherit from mx.view.View.
Views can also be nested, which means a View can have some sub views (their parent is called parentView), and the mx.app.Application class itself inherits from mx.view.View as well.
Please read UI Programming Guide for further information.
Write your first MX application
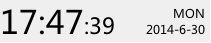
In the next couple of minutes, we are going to make a simple application which display the current time in the following way.
Create a web project
- In Eclipse, launch the New Project Wizard through
File > Project.... - Select
Web > Static Web Projectand clickNext.
- Name the project as you like then click
Finish. - Now you create an empty standard web project with the root content path named
WebContent, in which you can store your publishable resources. - If you have a local web server like IIS or Apache,
you may point the root web path to the
WebContentfolder for local testing.
Tips
In practice, you can create any type of web project instead, or even use MXFramework in a non-web project.
Enable MXFramework
- Create a new folder named
scriptsunderWebContent. This is where you store your JavaScript, CSS and other related resources including MXFramework itself. - Right click on the project and click
Propertiesto open the project properties dialog. - In the left side navigation list, choose
MXFramework.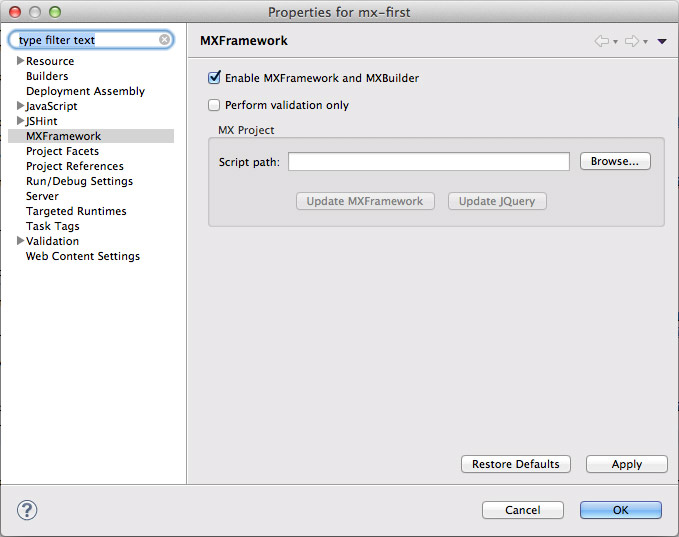
- Select the checkbox next to
Enable MXFramework and Builder. - Click
Browserbutton. - Select the
scriptsfolder we've just created and clickOK.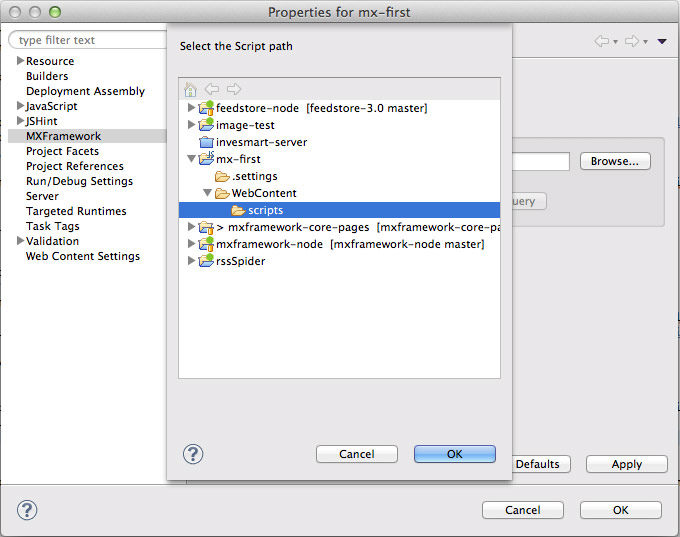
- Confirm when you see the upcomming two dialogs to automatically install
jQuery 2.0and the latest version ofMXFrameworkfrom Internet. - Click
OKto close the project properties dialog. - Once finished, your project will look like this
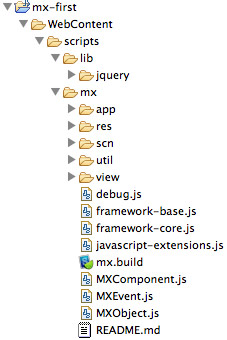 MXFramework is now installed in the
 scripts/mxfolder which also called the "mx" module, while jQuery is underscripts/libwhere you can also put frameworks or libraries from other third parties.
Tips
ou can also build the MXFramework project manually, please strickly follow the script folder structure like what you see here.
Alternatively, you can use other name for the script folder, and basically the folder could be put in anywhere as you like. But remember to change the
Script pathin the project properties dialog accordingly.
Create a view
Now you're going to write your first class based MXFramework.
- Right click on the project, and select
MXFramework > New MX Viewin the pop-up menu. - In the wizard, fill in the
Namespacefield withmy.first.viewandClass namewithDateTimeView, then clickFinish. There will be two files generated
WebContent/scripts/my/first/view/DateTimeView.js- Where to put your logical code of view.WebContent/scripts/my/res/DateTimeView.css- Where you can embellish your view.
- Open the
DateTimeView.js, override with the following code.
// Define the namespace
$ns("my.first.view");

// Import the stylesheet
$include("my.res.DateTimeView.css");

// Define the class
my.first.view.DateTimeView = function()
{
    var me = $extend(mx.view.View);
    // Public fields from super class
    me.elementClass = "DateTimeView";
    me.frame = { width: 210 };
    var base = {};

    // Public fields
    me.displaySeconds = false;

    // Private fields
    var _$timeLabel = null;
    var _$secondLabel = null;
    var _$dateLabel = null;
    var _$dayLabel = null;

    // Override method from super class
    base.init = me.init;
    me.init = function(p_options)
    {
        base.init(p_options);
        _initLabels();
        me.update();
    };

    // Private initializations.
    function _initLabels()
    {
        _$timeLabel = $("<span id=time>");
        me.$container.append(_$timeLabel);

        if (me.displaySeconds)
        {
            _$secondLabel = $("<span id=second>");
            me.$container.append(_$secondLabel);
        }

        _$dateLabel = $("<span id=date>");
        me.$container.append(_$dateLabel);

        _$dayLabel = $("<span id=day>");
        me.$container.append(_$dayLabel);
    }

    // Public methods
    me.update = function()
    {
        var now = new Date();
        _$timeLabel.text($format(now, "HH:mm"));
        if (me.displaySeconds)
        {
            _$secondLabel.text($format(now, ":ss"));
        }
        _$dateLabel.text($format(now, "yyyy-M-d"));
        _$dayLabel.text(['SUN', 'MON', 'TUE', 'WED', 'THU', 'FRI', 'SAT'][now.getDay()]);
        // Change the CSS class to 'dark' during night.
        me.$container.toggleClass("dark", now.getHours() <= 6 && now.getHours() >= 18);
    };

    return me.endOfClass(arguments);
};
my.first.view.DateTimeView.className = "my.first.view.DateTimeView";
Please also modify the DateTimeView.css.
.DateTimeView
{
    position: relative;
    display: block;
    background: #efefef;
}

.DateTimeView > #time
{
    font-size: 32px;
}

.DateTimeView > #second
{
    font-size: 22px;
}

.DateTimeView > #date
{
    position: absolute;
    bottom: 5px;
    right: 5px;
}

.DateTimeView > #day
{
    position: absolute;
    top: 5px;
    right: 5px;
}


.DateTimeView.dark
{
    background: #444;
}

.DateTimeView.dark > span
{
    color: white;
}
Tips
You can also open the
New MX Viewdialog by selectingFile > New > Other...and chooseMagicCube MXFramework > New MX View.
Create an application
Now we need a runnable application to contain and display the DateTimeView.
- Right click on the project again, and select
MXFramework > New MX Applicationin the pop-up menu. - In the
New MXApp Classdialog, type 'my.first' for theNamespaceandAppfor theClass name.
- Click
Finishbutton. You're going to have 3 new files.WebContent/scripts/my/first/App.jsWebContent/scripts/my/res/App.cssWebContent/App-debug.html
- Change the
App.jsto the following code.
$ns("my.first");

// Import the DateTimeView class.
$import("my.first.view.DateTimeView");

$include("my.res.App.css");

my.first.App = function()
{
    var me = $extend(mx.app.Application);
    me.appId = "my.first.App";
    me.appDisplayName = "New MX Application";
    var base = {};

    var _dateTimeView = null;

    base.init = me.init;
    me.init = function(p_options)
    {
        base.init(p_options);

        _initDateTimeView();
    };

    function _initDateTimeView()
    {
        // Create a DateTimeView with initial options.
        _dateTimeView = new my.first.view.DateTimeView({
            id: "dateTime",
            displaySeconds: true
        });
        // Add the _dateTimeView to application.
        me.addSubview(_dateTimeView);
    }

    base.run = me.run;
    me.run = function(args)
    {
        // Invoke the 'update' method every seconds.
        window.setInterval(function()
        {
            _dateTimeView.update();
        }, 1000);
    };

    return me.endOfClass(arguments);
};
my.first.App.className = "my.first.App";
Run in debug mode
Dive deeper
Compile and build
Run in production mode
What's next
I bet you already know some basic concept in MXFramework and how to setup the development environment. Now you may jump to the Documents page to find out more interesting contents.
Continue reading: